Add a tab in customer dashboard in Magento 2

Customers can manage and view their activities from account dashboard. The customer dashboard consists of several sections like “My Accounts”, “Orders” and “addresses” etc. Sometimes a store owner may require to enhance the user experience or create a new feature by adding a particular tab to the customer dashboard.
So today we will find out how we can achieve it in a few steps.
Begin with creating a frontend layout customer_account.xml inside your module and add a block with required arguments:
Know/Module/view/frontend/layout/customer_account.xml
<?xml version="1.0"?>
<page xmlns:xsi="http://www.w3.org/2001/XMLSchema-instance" xsi:noNamespaceSchemaLocation="urn:magento:framework:View/Layout/etc/page_configuration.xsd">
    <body>
        <referenceBlock name="customer_account_navigation">
            <block class="Magento\Customer\Block\Account\SortLinkInterface" name="customer-account-navigation-my-calendar">
                <arguments>
                    <argument name="label" xsi:type="string" translate="true">My Calendar</argument>
                    <argument name="path" xsi:type="string">module/calendar</argument>
                    <argument name="sortOrder" xsi:type="number">15</argument>
                </arguments>
            </block>
        </referenceBlock>
    </body>
</page>
| Name | Description |
|---|---|
Magento\Customer\Block\Account\SortLinkInterface | A sortable interface used to sort the navigation links. The sort order is provided in arguments. |
| label | Specifies the tab label. |
| path | Path is used to specify the target path or url when customer clicks the tab link. |
| sortOrder | Sorts the tab link display position. |
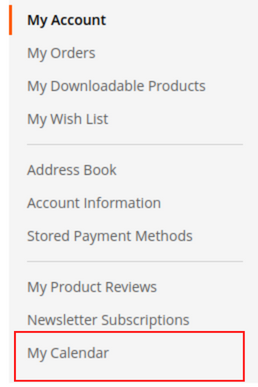
Flush the cache and load the customer dashboard index page. The output should be similar to the screenshot below:
Let us go ahead and add a separator before our tab link. Open your customer_account.xml layout file. This is an optional step. We are using it because we want to categories our feature tab.
Edit the layout: Know/Module/view/frontend/layout/customer_account.xml
<?xml version="1.0"?>
<page xmlns:xsi="http://www.w3.org/2001/XMLSchema-instance" xsi:noNamespaceSchemaLocation="urn:magento:framework:View/Layout/etc/page_configuration.xsd">
    <body>
        <referenceBlock name="customer_account_navigation">
            <block class="Magento\Customer\Block\Account\SortLinkInterface" name="customer-account-navigation-my-calendar">
                <arguments>
                    <argument name="label" xsi:type="string" translate="true">My Calendar</argument>
                    <argument name="path" xsi:type="string">module/calendar</argument>
                    <argument name="sortOrder" xsi:type="number">15</argument>
                </arguments>
            </block>
            <!-- Add a separator -->
            <block class="Magento\Customer\Block\Account\Delimiter" name="customer-account-navigation-delimiter-3" template="Magento_Customer::account/navigation-delimiter.phtml">
                <arguments>
                    <argument name="sortOrder" xsi:type="number">20</argument>
                </arguments>
            </block>
        </referenceBlock>
    </body>
</page>
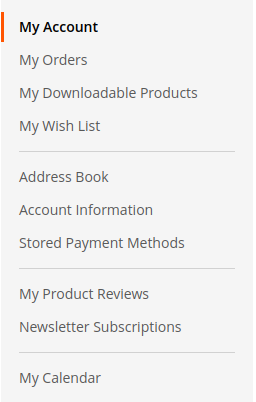
Make sure the sort order for delimiter is greater than the tab link. The output should look like this now:
In next step we will create a custom page for our new tab link. The page should appear inside the customer dashboard. First define a route by creating the routes.xml file under etc/frontend directory.
Create file: Know/Module/etc/frontend/routes.xml
<?xml version="1.0"?>

<config xmlns:xsi="http://www.w3.org/2001/XMLSchema-instance" xsi:noNamespaceSchemaLocation="urn:magento:framework:App/etc/routes.xsd">
    <router id="standard">
        <route id="module" frontName="module">
            <module name="Know_Module" />
        </route>
    </router>
</config>
Now create Index controller under Controller/Calendar directories.
Create the controller: Know/Module/Controller/Calendar/Index.php
<?php
namespace Know\Module\Controller\Calendar;

use Magento\Framework\App\Action\Context;
use Magento\Framework\View\Result\PageFactory;

class Index extends \Magento\Customer\Controller\AbstractAccount
{
    /**
     * @var PageFactory
     */
    protected $resultPageFactory;

    public function __construct(
        Context $context,
        PageFactory $resultPageFactory
    ) {
        $this->resultPageFactory = $resultPageFactory;
        parent::__construct($context);
    }

    public function execute()
    {
        return $this->resultPageFactory->create();
    }
}
In next and last step create a layout and associated phtml template file.
Create layout first: Know/Module/view/frontend/layout/module_calendar_index.xml
<?xml version="1.0"?>

<page xmlns:xsi="http://www.w3.org/2001/XMLSchema-instance" xsi:noNamespaceSchemaLocation="urn:magento:framework:View/Layout/etc/page_configuration.xsd">
    <update handle="customer_account"/>
    <head>
        <title>My Calendar - Dashboard</title>
    </head>
    <body>
        <referenceBlock name="page.main.title">
            <action method="setPageTitle">
                <argument translate="true" name="title" xsi:type="string">My Calendar</argument>
            </action>
        </referenceBlock>
        <referenceContainer name="content">
            <block class="Magento\Framework\View\Element\Template" name="tab.mycalendar" template="Know_Module::mycalendar.phtml" />
        </referenceContainer>
    </body>
</page>
Now create the specified template: Know/Module/view/frontend/templates/mycalendar.phtml
<?php
/**
* @var \Magento\Framework\View\Element\Template $block
* @var \Magento\Framework\Escaper $escaper
* @var \Magento\Framework\View\Helper\SecureHtmlRenderer $secureRenderer
*/
?>
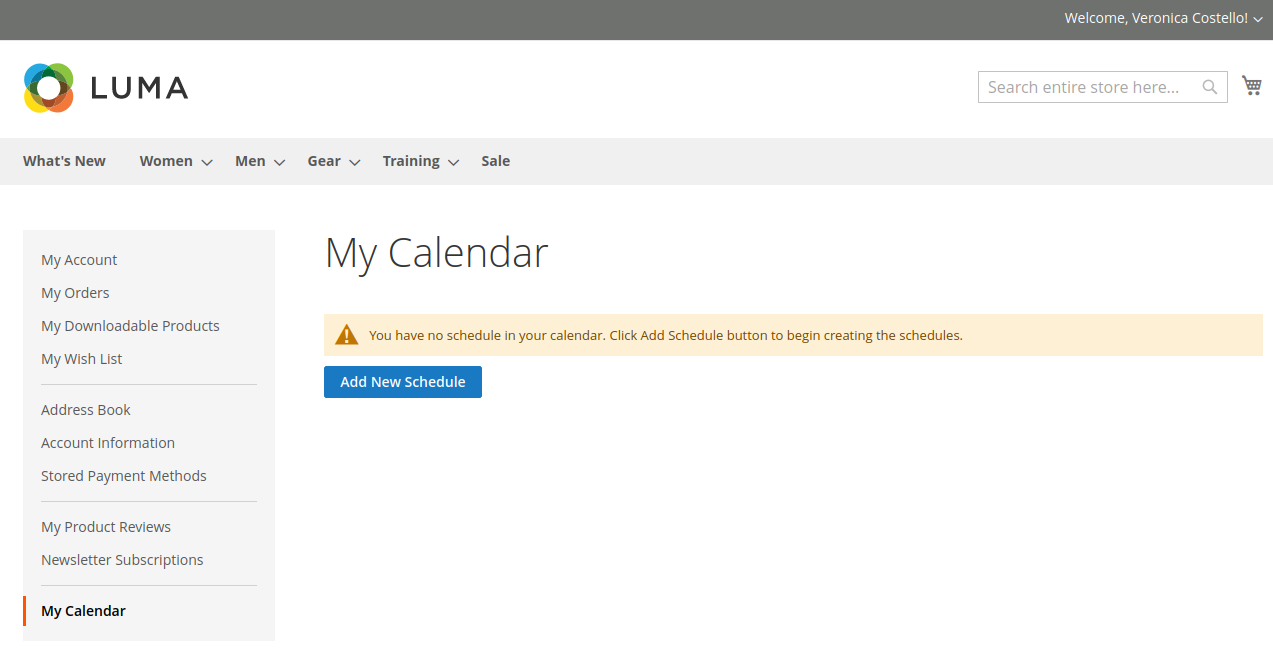
<div class="message info empty"><span><?= $escaper->escapeHtml(__('You have no schedule in your calendar. Click Add Schedule button to begin creating the schedules.')) ?></span></div>
<div class="actions-toolbar">
<div class="primary">
<button type="button" role="add-schedule" title="<?= $block->escapeHtmlAttr(__('Add New Schedule')) ?>" class="action primary add"><span><?= $block->escapeHtml(__('Add New Schedule')) ?></span></button>
</div>
<div class="secondary">
<a class="action back" href="<?= $escaper->escapeUrl($block->getUrl('customer/account/')) ?>">
<span><?= $escaper->escapeHtml(__('Back')) ?></span>
</a>
</div>
</div>
The output for our new tab looks like below: